
GitHub’s “Vigilant Mode” is a security feature that affects how commit signatures are shown — it doesn’t run in the background like a process but rather changes how your commits appear on GitHub’s interface.
The feature Vigilant Mode for GitHub commit-signature verification was first introduced on April 28, 2021 (in beta).
🔐 What Vigilant Mode Does
When Vigilant Mode is enabled:
- GitHub marks all unsigned commits you make as “Unverified” (even if they’re legitimate).
- It encourages using GPG or SSH signing for every commit.
- It doesn’t block anything, but it visibly flags commits to help you (and others) notice unsigned activity.
⚙️ How It Works (Background Behavior)
It’s not a background process on your system — it’s a GitHub-side feature:
- When you push a commit, GitHub checks its signature metadata (from GPG, SSH, or S/MIME).
- If it’s valid and tied to your GitHub account → shows ✅ “Verified”.
- If not → shows ⚠️ “Unverified” or “Unverified (Vigilant Mode)”.
So the “background” effect is on GitHub’s verification display, not something your computer is running.
🧩 Why It Exists
Vigilant Mode helps:
- Prevent impersonation attacks – Git commit metadata (author/committer) can be spoofed — someone could push a commit attributing someone else.
- Enforce commit authenticity within teams or orgs. – To raise trust and authenticity in contributions: by enabling Vigilant Mode, a user ensures that all commits attributed to them are signed, and GitHub will mark unsigned ones as Unverified.
- Encourage developers to sign all commits. – It helps identify cases where someone might commit under your identity (intentionally or accidentally) — especially in open-source, supply-chain and multi-author contexts.
🔰 👤🆕 For new github account
If you are have created new account you need to do the following to achieve the verified tag
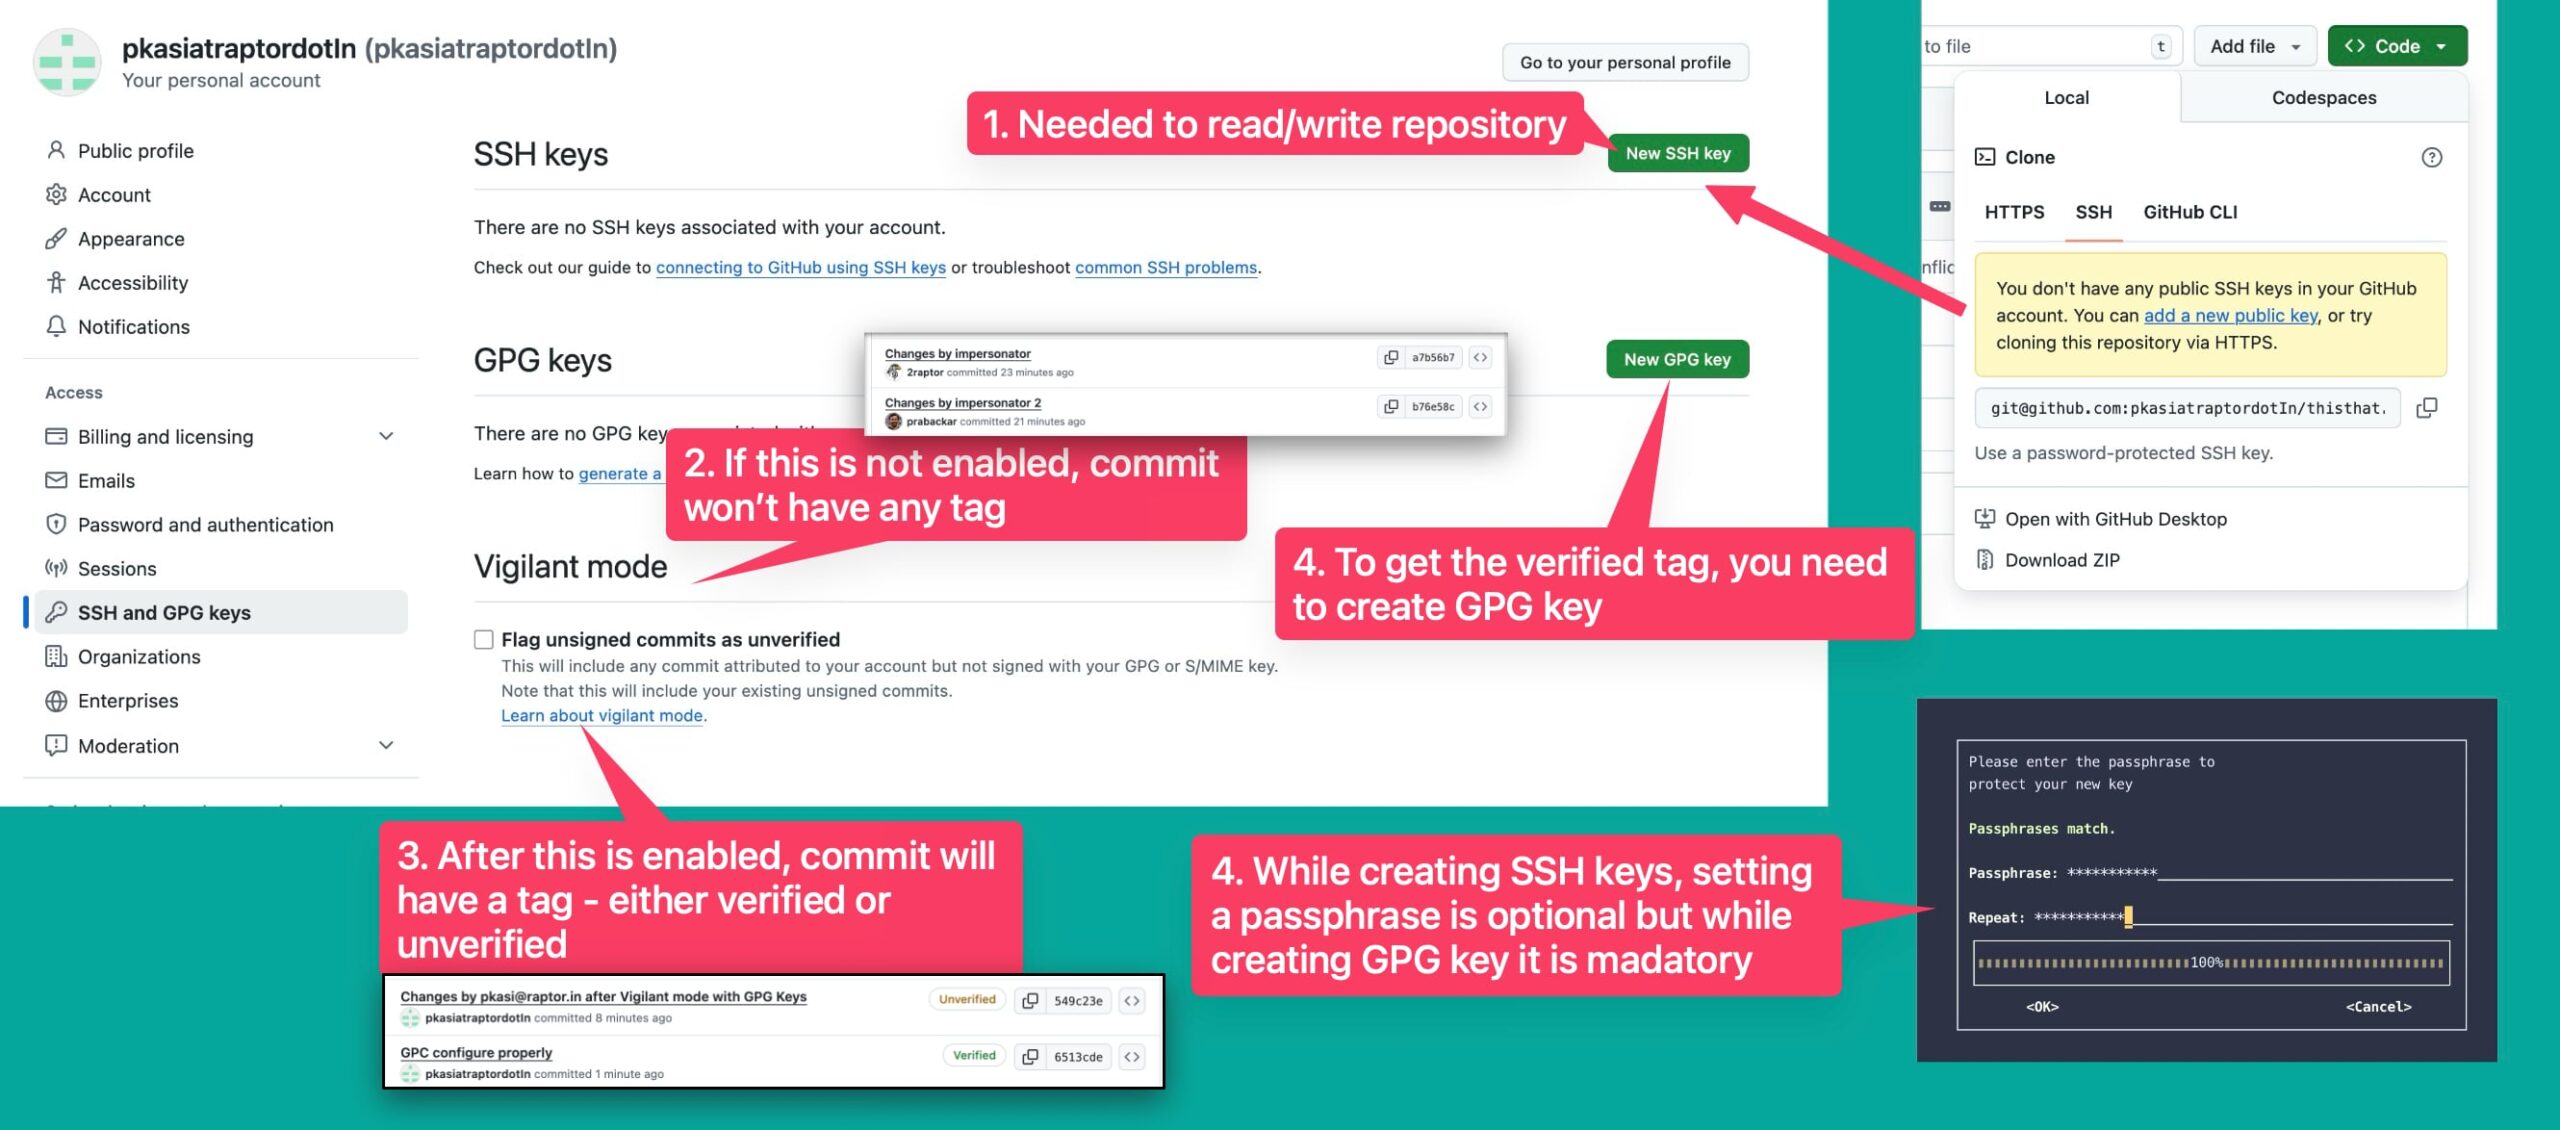
- Create SSH Keys (for read/write access)
- SSH keys must be added in GitHub → Settings → SSH and GPG keys.
- SSH keys are required to read/write repositories over SSH.
- Enable Vigilant Mode -> GitHub → Settings → SSH and GPG keys
- If Vigilant Mode is OFF, your commits won’t show any tag (no “Verified” or “Unverified” tag).
- When Vigilant Mode is ON, GitHub will tag every commit as either:
- Verified (if signed with GPG or S/MIME), or
- Unverified (if unsigned).
- Create GPG Keys (for Verified commits)
- To get the “Verified” badge on commits, you must create and add a GPG key to GitHub.
- Creating a GPG key requires setting a mandatory passphrase.
- Creating an SSH key uses an optional passphrase, but GPG requires one.
- Remember to get the global or project level git config
- Global
- git config –global user.email your@email.com
- git config –global user.name “Your Name”
- Local / Individual Repo
- git config user.email your@email.com
- git config user.name “Your Name”
- To check your current settings
- git config –list –show-origin
- Global
- Understanding SSH vs GPG
- SSH key → Needed to clone/push via SSH.
- GPG key → Needed to sign commits and show the Verified badge.
- After setup -> Commit Tags After Enabling Vigilant Mode
- Once enabled and you have setup properly, every commit will show:
- Verified (green badge), or
- Unverified (yellow badge).
- Once enabled and you have setup properly, every commit will show:

🕵️♂️ Explaining the impersonation problem

If you look at the history of commit message about from the top. First three commits was done by pkasiatraptordotin but it was easy impersonate as 2raptor and prabackar by simply changing the git config –global user.email “email-of-person-to-impersonate” before making the commit. All three commits used ssh key from pkasiatraptordotin. Once Vigilant mode is enabled it will not be possible to impersonate.
❌ Error and fixes
Sharing the error and fixes that you may encounter
1) # Error when you try to add ssh pub key instead of private key

ssh-add --apple-use-keychain ~/.ssh/pkasiatraptordot_in_ed25519. pub
WARNING: UNPROTECTED PRIVATE KEY FILE!
aaacaaaaaaaaaaaaaaaaaaaaaaaaaaaaaaaacaaaaaaaaaaaaaaaaaa.aaa
Permissions 0644 for '/Users/pkasi/.ssh/pkasiatraptordot in ed25519 pub' are too open.
It is required that your private key files are NOT accessible by others.
This private key will be ignored.

=================

2) # Error - Key generation failed: Timeout. When you take lot of time to enter passphrase to protect your new key.

pkasi@raptor-lm
~/dev/thisthat
modified-by-pkasiatraptordotin
gpg (GnuPG) 2.4.8; Copyright (C) 2025 g10 Code GmbH
This is free software: you are free to change and redistribute it.
There is NO WARRANTY, to the extent permitted by law.
Please select what kind of key you want:
(1) RSA and RSA
(2) DSA and Elgamal
(3) DSA (sign only)
(4) RSA (sign only)
(9) ECC (sign and encrypt) *default*
(10) ECC (sign only)
(14) Existing key from card
Your selection? 1
RSA keys may be between 1024 and 4096 bits long.
What keysize do you want? (3072)
Requested keysize is 3072 bits
Please specify how long the key should be valid.
0 = key does not expire
‹n> = key expires in n days
<n>w = key expires in n weeks
<n>m = key expires in n months
‹n>y = key expires in n years
Key is valid for? (0)
Key does not expire at all
Is this correct? (y/N) y
GnuPG needs to construct a user ID to identify your key.
Real name: Prabhakar Kasi
Email address: pkasi@raptor.in
Comment: Hello
You selected this USER-ID:
"Prabhakar Kasi (Hello) <pkasi@raptor.in>"
Change (N)ame, (C) omment, (E)mail or (0) kay/(Q)uit? C Comment:
You selected this USER-ID:
"Prabhakar Kasi <pkasi@raptor.in>"
Change (N)ame, (C)omment, (E)mail or (0) kay/(Q)uit? 0
We need to generate a lot of random bytes. It is a good idea to perform some other action (type on the keyboard, move the mouse, utilize the disks) during the prime generation; this gives the random number generator a better chance to gain enough entropy. gpg: agent_genkey failed: Timeout Key generation failed: Timeout